
Record your screen
You can use QuickTime Player to make a video recording of your screen or just a region of your screen and save it as a movie file for later viewing. This can be helpful for showing others how to perform a task, workflow, or for training.
Choose File > New Screen Recording. To start recording what’s occurring on your Mac’s screen, click the round record button.
You can record some of all of the screen:
- If you want to record the entire screen, click anywhere on the screen to start recording.
- To record just a smaller portion of the of the screen, drag your pointer to select the region of the screen you want to record, and then click the Start Recording button within the region.
To stop recording, click the stop button in the menu bar, or press the Command-Control-Escape key combination (all at once) on the keyboard.
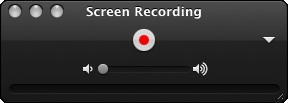
Clicking the triangle icon gives you additional options, such as letting you choose whether to use the built-in microphone on your Mac, an external microphone you’ve connected to your Mac, a microphone from a connected Apple display, or the option to simply use no microphone at all. The triangle also allows you to adjust the finished quality of your screen recording, select whether or not your mouse clicks are shown during the recording (the pointer is highlighted when you click), and to select what location (on your Mac) to save your screen recording when finished.

Tip: Changing the quality from Medium to High will result in higher-quality movie file with a larger file size.