Flight of the RoboBees | Replacing dying bees with robots

As the rapid advancement of CCD began to reach feverish levels in June of this year, President Obama created a task force charged with solving the mystery within 180 days. The response from America’s brightest minds was swift and penetrating.

Harvard University scientists have come up with a deceptively simple solution that could also provide a potential boon for the nation’s growing drone industry: Replace the dead bees with micro-aerial vehicles that pollinate on command—robo-bees. It’s a gamble, but in these disruptive times, even nature needs to innovate if it wants to stay relevant.

Like “a mechanical flash mob,” as one journalist put it, the robo-bees are able to efficiently function within a swarm of thousands and self-assemble into a variety of shapes, including letters, numbers and even a five pointed star.

But it’s not just anthophila that are dying en masse. Neonic pesticides have also been linked to a more general decline in insect populations across the map, which has created a schism in nature’s managerial structure — fewer insects means less food for birds, which means fewer birds and so on and so forth.

From an engineering perspective, birds present a more complex challenge. One area where their robotic analogs could be of use is to replace a bird’s traditional function of spreading seeds from the various plant life it consumes.

via Flight of the RoboBees | Adbusters.

How Caffeine Evolved to Help Plants Survive and Help People Wake Up

Cocoa BeansScientists had already determined that caffeine was also made in other plants, like tea and cacao, by N-methyltransferases. But by sequencing the coffee genome, Dr. Albert and his colleagues were able to make a more detailed comparison of the genes in different species. They discovered that in cacao, the enzymes manufacturing caffeine did not evolve from the same ancestors as those in coffee.

In other words, the coffee plant and cacao plant took different evolutionary paths to reach the same destination. Evolutionary biologists call this sort of process convergent evolution.

Continue reading →

8th Grade Science Reading Projects 4-7 • Project 4: Article: Ebola and the Vast Viral Universe • Projects 5, 6, 7: Finish First Chapters 2, 3, 4 of Life on Earth

  • Classification of Life (Do Viruses meet six characteristics of living things? Reread Chapter 1.3, Life on Earth)

http://nyti.ms/1wvsCka

By all evidence, researchers say, viruses like Ebola have been parasitizing living cells since the first cells arose on earth nearly four billion years ago. Some say that viruses actually invented cells.

Aids Virus Electron Microscope

Continue with your Life on Earth Reading- Goal is to finish the four Unit 1 Chapters (Passing all Open-Book Quizzes with 100%) by Nov 7

Table of Contents
Unit 1: Unity and Diversity of Life on Earth
1. What Is Life?
2. The Chemistry of Life
3. Evolutionary Mechanisms
4. History of Life on Earth


(Read through the Dale-chall difficult word list definitions- see links to videos when necessary)


Q2 Plant Science: Project 2b: Grower’s Calendar • Wisconsin Fast Plants® Program

GROWER’S CALENDAR

Follow the grower’s calendar for Fast Plants® to help get your plan underway. Use the links to find more detailed instructions about each task.Fill in the dates as you plan for planting and growing your Fast Plants®.

Task Day of Cycle (time required) Activities
Preparation Start (1 1/2 hrs)Date:____________
  1. Assemble light bank and rack or light box.
  2. Set up reservoirs.
  3. Saturate water mat according to growing instructions.
  4. Arrange all planting materials.
Planting Day 1 (1 hr)Date:____________
  1. Plan to start life cycle on a Monday or Tuesday.
  2. Plant, water from above, label, set planters (quads, deli containers, or bottle tops) on water source (watermat or water reservoir bottom) with soil surface 5–10 cm (~2 inches) from the lights.
Germination Days 2– 3Date:____________
  1. Water from top with pipet.
  2. Cotyledons emerge.
Tending Days 4–5 (30 min)Date:____________
  1. Thin to 1 plant per cell.
  2. Transplant if necessary to obtain 1 plant in every cell.
  3. Check the water level in the reservoir!
Growth Days 6–11 (15 min/day)Date:____________
  1. Check plants and reservoir level daily throughout the rest of the life cycle.
  2. Observe growth and development.
Flowering Day 12 (30 min)Date:____________
  1. Flower buds beginning to open.
  2. Make bee sticks.
Pollination Days 13–18 (15 min/day)Date:____________
  1. Pollinate for 2–3 consecutive days.
  2. On the last day of pollination, pinch off any remaining unopened buds.
Seed Development Days 17–35 (10 min/day)Date:____________
  1. Observe seed pod development.
  2. Embryos mature in 20 days.
Seed Maturation Day 36 (30 min)Date:____________
  1. Twenty days after the last pollination, remove plants from water reservoir.
  2. Allow plants to dry for 5 days
Harvesting Day 40 (30 min)Date:____________
  1. Harvest seeds from dry pods.
  2. Clean up all equipment.
  3. Plant your own seeds or store them appropriately.

GROWER’S CALENDAR

Continue reading →

Q2 Plant Science Project 3: Brassica Butterfly and Wisconsin Fast Plants

BRASSICA BUTTERFLY

Plants and butterflies … they coexist in nature. Isn’t it time they were brought together in the classroom?

How an insect gets from a tiny egg to an adult butterfly is a fascinating process. The butterfly life cycle investigation begins with eggs. From day one, students are making observations, predictions, collecting data and asking questions about the life cycle. Once the eggs have hatched, the biology of this organism will unfold, challenging students to understand not only the various life cycle stages of the organism but also how this organism interacts with plants (brassicas) and other components of its environment. Each stage of the butterfly’s development provides students with opportunities for observations, ideas, analysis, experimentation and creative communication. Through raising butterflies plant material and understanding its life cycle, the foundation is set for students to launch into experimentation and inquiry-based learning.

SEARCH THE DIGITAL LIBRARY FOR ACTIVITIES »

Brassica and Butterfly

Investigating Life with the Cabbage White Butterfly and Brassicas in the Classroom 

Materials developed for the “Brassica and Butterfly” workshops (Summer/Fall 2002, funded by NASA). Includes life cycle information, rearing instructions, activities for the classroom, and troubleshooting.

BRASSICA BUTTERFLY

Plants and butterflies … they coexist in nature. Isn’t it time they were brought together in the classroom?

How an insect gets from a tiny egg to an adult butterfly is a fascinating process. The butterfly life cycle investigation begins with eggs. From day one, students are making observations, predictions, collecting data and asking questions about the life cycle. Once the eggs have hatched, the biology of this organism will unfold, challenging students to understand not only the various life cycle stages of the organism but also how this organism interacts with plants (brassicas) and other components of its environment. Each stage of the butterfly’s development provides students with opportunities for observations, ideas, analysis, experimentation and creative communication. Through raising butterflies plant material and understanding its life cycle, the foundation is set for students to launch into experimentation and inquiry-based learning.

SEARCH THE DIGITAL LIBRARY FOR ACTIVITIES »

Brassica and Butterfly

Investigating Life with the Cabbage White Butterfly and Brassicas in the Classroom

Materials developed for the “Brassica and Butterfly” workshops (Summer/Fall 2002, funded by NASA). Includes life cycle information, rearing instructions, activities for the classroom, and troubleshooting.

Download Investigating Life with the Cabbage White Butterfly and Brassicas in the Classroom »

via Wisconsin Fast Plants® Program.

Q2 Plant Science Project 2a: 4 Steps to Growing Wisconsin Fast Plants (Project Planner/Supply Ordering Tool)

GETTING STARTED

Let us help you decide how to make or get a kit to start growing your own. Make your selections below.

STEP ONE – CHOOSE A LIGHTING SYSTEM
OPTION 1:
LIGHT BOX
Low-cost, good for group experiments and stacking in vertical space.
Learn More »Build It
OPTION 2:
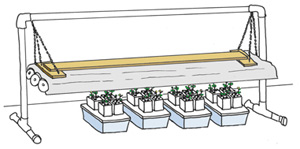
LIGHT BANK
Use a wooden bank or PVC for this horizontal space efficient system.
Learn More »Build It
OPTION 3:
GET A KIT
Plant Light House
Get a Kit

Plant Lighting System Get a Kit

Individual Plant Light Deselect

STEP TWO – CHOOSE A GROWING SYSTEM
OPTION 1:
GROW PLANTS
Recycled Bottle Growing Systems – made from small or large plastic soda bottles.
Learn More »Build It


Recycled Deli Container
Growing System
 – a very stable growing system 4-5 plants.
Learn More »Build It
OPTION 2:
GERMINATE SEEDS
Observe germinating seeds and grow seedlings for days in a Petri dish. Quick way to model Mendelian inheritance patterns.
Learn More »Germinate Seeds
OPTION 3:
GET A KIT

Complete Kit Includes quads, wicking water system, planting materials, fertilizer and Standard seeds.

Quads
Watering system tray, mats and wicks plus Quads, 4-cell foam planters.

Monohybrid Labs
Petri dish Genetics kits
monohybrid labs.

Dihybrid Labs
Petri dish Genetics kits
dihybrid labs.

STEP THREE – GET A POTTING MIX & FERTILIZER
OPTION 1:
PLANTING MEDIUM
A soil-less mix or seed starter from your local garden or hardware store.
Learn More » Vermiculite sometimes used to cover seeds after planting: holds moisture and makes it easier to see when seeds are covered.
Learn More » 
FERTILIZER
Time-release, pelleted fertilizer like Osmocote 14-14-14 are an easy-to-use option we often use.
Learn More »Water-soluble fertilizer that is measured and mixed gives the most accurate control of nutrients. We use Peter’s 20-20-20.
Learn More »
OPTION 2:
GET A KIT

Complete Kit Includes quads, wicking water system, planting materials, fertilizer and Standard seeds.

STEP FOUR – SELECT YOUR SEED
OPTION 1:
STANDARD STOCK

Wisconsin Fast Plants Standard Stock

Most Fast Plants classroom activities use Standard Stock seed.
Learn More »

OPTION 2:
GENETIC HYBRIDS &
MUTANTS
Wisconsin Fast Plants Genetic Hybrids and MutantsSpecialized plant types for investigating topics such as: genetics, physiology, and environmental studies.
Learn More »
OPTION 3:
GET A KIT

Complete Kit – Standard Seed Includes the complete kit with Standard seeds.

72 Hour Genetics
Complete Kit A quick monohybrid genetics lab.

Who’s the Father?Genetics Complete Kit
A 45-day investigation.

Now that you have gone through the decision making steps, follow MY PLAN we created for you on the right. Download instructional PDF’s, view the links, and watch the videos to guide you through the building processes. Or if you decided to get a kit, click the “Buy It” link to purchase online from available suppliers

via Wisconsin Fast Plants® Program.

Q2 Plant Science Project 1b: Constructing a Wisconsin Fast Plants Light Bank

LIGHT BANK SYSTEM

The light bank system is most appropriate for growing large numbers of plants. 

The light bank system is most appropriate for growing large numbers of plants. The light bank uses only 4.5 x 2.5 feet of space, which will accommodate several large classroom experiments. The light bank consists of 6 or more 4-foot fluorescent bulbs side by side. The most common bulb used is a 40-watt Cool White Deluxe™, but other 4-foot bulbs such as a 34-watt or a 40-watt Cool White™ are also acceptable for growing Fast Plants®.

Building Your Own Light Bank

As plants grow, the lights and/or plants are adjusted to keep the top of the plants 5-10 cm from the light bulbs. Appropriate lighting is perhaps the most critical component of a plant’s growing environment. Fast Plants® were bred to do well with the light produced by fluorescent lamps. Plants grown too far from lights or under weak light will be spindly and tend to fall over easily. Aluminim foil curtains can be used to increase the amount of light reaching the plants, especially those growing on the edges.via Wisconsin Fast Plants® Program.

Q2 Plant Science Project 1a: Building a Light Box System Wisconsin Fast Plants® Program

LIGHT BOX SYSTEM

The Plant Light Box is a low-cost alternative for growing Fast Plants® and other plants. It is ideal for small classroom experiments or group projects, and is designed so students and teachers can build their own.

Instructions for Building a 2-crate Plant Light Box SystemThese Light Boxes use two stackable plastic file crates that are cut, lined with aluminum foil, lit with a high efficiency fluorescent bulb, and stacked (after plants are tall). Each Light Box of this type can hold 12-15 small Bottle Growing Systems or 7 Deli-container Growing Systems (or 2-liter Bottle Growing Systems) or 1 Quad Growing System.

Note: Most file crates have slight differences in how they are manufactured; however, we have used all sorts of crates with success by making a few changes to these basic assembly procedures.

Materials
For each 2-crate Plant Light Box, you will need:

  • Two stackable plastic file crates that measure 17 1/4″ x 14 1/4″ x 11 1/2″ (sold at an office supply store). Notice that we like to use crates that have either a solid bottom or a solid plastic spot in the center of the long sides because this is where we will attach the light.
  • Aluminum foil roll, 12″ wide
  • Double-stick tape
  • Clear tape (e.g. Scotch Tape)
  • Hacksaw-type handsaw
  • Scissors
  • Tin snips (optional)
  • 40 or 42 watt compact fluorescent lamp (CFL) – this is a 150 watt equivalent high efficiency bulb “cool white” if available)
  • Drop work light (an extension cord and light socket can also be used; however, extension cords are not allowed in many schools)
  • Drill and 1″ paddle drill bit or sharp pocket knife for cutting a 1″ hole in the plastic crate for the light fixture
  • Plastic zip ties


Assembly Instructions:

via Wisconsin Fast Plants® Program.

Q2 Plant Science Project 1 • Constructing Wisconsin Fast Plants® Light Box or Light Bench

GROWING & LIGHTING

On this page, two options for lighting systems and three options for growing systems are explained. Time needed for entire life cycle: 40-45 days.

Regardless of the systems you choose for your Fast Plants®, remember that they need:

  • Continuous fluorescent light (lights turned on 24 hours a day).
  • Continuous supply of water and fertilizer (use a self-watering system and apply fertilizer through the water or in pelleted form added to the soil when the seeds are planted).


Lighting System Options

Light Box System
Low-cost, good for group experiments and stacking in vertical space – easy to build or available in a kit.

LEARN TO BUILD ONE »

BUY A KIT »

Light Bank System
Use a wooden bank or PVC for this horizontal space efficient system.

LEARN TO BUILD ONE »


via Wisconsin Fast Plants® Program.